Install and Configure TDS (Team Development For Sitecore ) in Sitecore
If you are a Sitecore developer and you are working with a team then i am sure you will need to serialize your items to take under one roof. so that any team member take it easily.
So we have two ways to do these things.
a. Create a package and install
b. Use TDS/Unicorn to sync your items.
first approach personally i don't like because it will take too much time and creation a package a headache.
So i will prefer second approach due to flexibility and maintainability. right now i am choosing TDS. Unicorn setup we will create later so in this post we will install and configure TDS.
What is TDS?
Team Development for Sitecore (TDS) gives you the ability to keep track of all the Sitecore items in your project, by bringing them into a Microsoft compliant Source Code Control system. Using TDS, you will improve the control and overall performance of the team and your project.
it have many benefits like your all Sitecore items and code are stored in a single repository, meaning backups are easy to do, making your work safe.
Developers can work remotely or disconnected from the network and then sync and merge changes at a later date to the source code control system. and you can easily compare versions of items and code.
you can download TDS from here.
Install TDS:
Once you finish downloading just extract folder and choose exe. according to version.
just click on exe and start the installation and choose agree and press next button.


Configure TDS:
Once you finish the installation. the time is to create new TDS project to serialize items under one roof. generally we can create multiple project as per requirement. So moving on to create new TDS project just go in visual studio and choose TDS Project and create it.
under properties you will see many option. just click on build tab and configure. all fields i have highlighted in SS.
a. Set your Sitecore Web URL.
b. Choose your Sitecore Deploy folder location.
c. Check the checkbox install sitecore connector.
d. Press the Test button.
once you press the button it will test your connection if done then it will show the message all test passed and your ready to sync items.
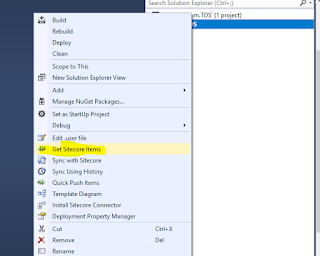
Means all set. now we can sync our items so happily moving on project and right click choose Get Sitecore Items and click on that.
it will open new window and you can choose items whatever you want to sync and press Get items Button.

Hope this will help to serialize your items.
Happy Coding!


Comments
Post a Comment