Installation and configuration Sitecore Email Experience Manager Part-1
EXM Part 1: Install&Configure EXM
EXM module divided in to two series.
EXM Part 1: Install&Configure EXM.
EXM Part 2: Explore EXM emails and reporting Data.
Recently I got a chance to configure EXM at my instance so I think I should be capture all the steps. So let's start to configure Sitecore Email Experience Manager and send emails.
EXM Part 1: Install&Configure EXM.
EXM Part 2: Explore EXM emails and reporting Data.
Recently I got a chance to configure EXM at my instance so I think I should be capture all the steps. So let's start to configure Sitecore Email Experience Manager and send emails.
I am using Sitecore 8.2 update 7 so I have download EXM as per my version. For download the EXM you can go with this URL
So when you finish downloading and extract
folder you see many files but you have to pick below highlited file.
Before installation we have to put some
configuration like connection string and authenticated key under connection
String file
Installation
Pre-requisite
Here I am going to mention what we need to do before
installation EXM. We have to do steps in connection string to add empty
connection and authentication key.
a. Go inside the website/App_config and open connection string file and put the below
connection string.
<!—EXM Connection -->
<add name="exm.master" connectionString="" />
<add name="exm.web" connectionString="" />
b. Add two connection string EXM.CryptographicKey
and EXM.AuthenticationKey. copy below connection string and paste. Remove highlighted
key and re generate new key from here.
<add name="EXM.CryptographicKey"
connectionString= "35338a6180f18188ec8ef8900b54be9c1e7c8dab24bd156545a59962a6d5b14f"
/>
<add
name="EXM.AuthenticationKey" connectionString= "e1d2baab29c12768d2f2543830040a9f358c08d1834d4addf46035330a8e6201"
/>
Note: Just remember both are different you have to
generate two keys and second thing select hexadecimal and put 32 in text box
when you generating new key.

After generating key just copy and put on notepad and remove
all spaces between keys and put in connection string. Save your connection
string file and moving on installation EXM package.
So all set we are moving to install EXM package. So choose
below file to install EXM package by installation
wizard.
Email
Experience Manager 3.5.2 rev. 180411
Configuration
Once you complete the installation just restart the server
and we have to attach EXM database with Sql server. So where the EXM Database?
EXM data base will present in data folder.
So for attaching database moving on Sql server. Right click
on database and choose attach and select Sitecore.Exm.mdf
and Sitecore.Exm_web.mdf database. Modify
connection string whatever we have define earlier for those database.
Note: we have to do some permission for both databases
to granting execute tight to stored procedures. so write click on database and
choose properties and go inside permission and choose execute and give Grant
permission.
Next step you have to go in this file /App_config/Include/Sitecore.Analytics.Tracking.config and change ClusterName value and set your local
instance host name.
<setting name="Analytics.ClusterName"
value="yourlocalinstance"
/>
Lastly we have to setup MTA(message transfer agent). Exm has
two option available for setting up an agent.
a. Sitecore Email Cloud
b. Custom SMTP
Sitecore Email cloud need subscription so most of the cases
we use this on prod environment. To read more about Sitecore Email Cloud just
go through this URL
For now we are choosing Custom
SMTP to test on local EXM
Configure SMTP
a. In this path \App_Config\Include\EmailExperience you will find below file. Just add
the suffix .disabled in below file.
1.
Sitecore.EDS.Providers.SparkPost.config.disabled
2.
Sitecore.EDS.Providers.SparkPost.Sync.config.disabled
b. In this path \App_Config\Include\EmailExperience you will find below file. Just remove
the suffix .disabled in below file.
1.
Sitecore.EDS.Providers.CustomSMTP.config
2.
Sitecore.EDS.Providers.CustomSMTP.Sync.config
c. Open this Sitecore.EDS.Providers.CustomSMTP.config
file and update custom smpt setting looks like.
d. Open this Sitecore.EDS.Providers.CustomSMTP.Sync.config
file and update your pop setting.
Note: I used GMAIL
SMTP configuration to send out
emails so put your user name under user name section and password in password
section.
f. One more thing we have to update in web.config
file under root folder. Copy below line and paste under appSetting section.
<add
key="eds:define" value="CustomeSMTP" />
<add
key="exmEnabled:define" value="yes" />
So configuration part done moving on Sitecore and verify its
install properly or not. When you click Sitecore and go under content then you
will see Email campaign folder.

Testing MTA Connection
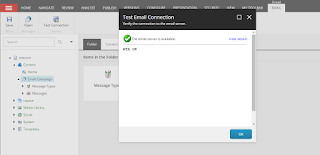
In Sitecore EXM Manager Root Item there is a test connection
button to test server. Just click on that it will verify your connection to MTA.
This will work for both Email cloud and CustomSMTP providers.
When you establish successful connection then it will show
looks like.
If you see the green status, then you are ready to send emails.
Sometimes MTA connection failed so for that firstly check
your log file under data folder.
a. Eds.log
b. Exm.log
a. Eds.log
b. Exm.log
And second thing what I have faced. Gmail blocks signing in
from unsecure apps so when you are using EXM then you have to on this “allow less
secure apps” through your google
account.
Hopefully this will be helpful.
in next artical we will setup emails with tokens and multilingual email and explore reporting data.
in next artical we will setup emails with tokens and multilingual email and explore reporting data.
Happy coding!


Comments
Post a Comment